メールサーバの証明書を正式版に
メールサーバには自前のサーバ証明書を使っていたが、メーラーによっては公式な証明書でないとアカウント設定できないものがあってちょっと困ったので、証明書を正式(公式)なものにした。
ついでに、SSL/TLSの対応もしておいた。
サーバ証明書の作成
証明書はWebサーバと同じく、certbotで作成できる。手順は以下。
root@svr:/etc/letsencrypt# certbot certonly --webroot -w /home/share/web-root/html -d svr.sakanashi.mydns.jp
Saving debug log to /var/log/letsencrypt/letsencrypt.log
Requesting a certificate for svr.sakanashi.mydns.jp

Successfully received certificate.
Certificate is saved at: /etc/letsencrypt/live/svr.sakanashi.mydns.jp/fullchain.pem
Key is saved at:         /etc/letsencrypt/live/svr.sakanashi.mydns.jp/privkey.pem
This certificate expires on 2026-03-24.
These files will be updated when the certificate renews.
Certbot has set up a scheduled task to automatically renew this certificate in the background.

- - - - - - - - - - - - - - - - - - - - - - - - - - - - - - - - - - - - - - - -
If you like Certbot, please consider supporting our work by:
 * Donating to ISRG / Let's Encrypt:   https://letsencrypt.org/donate
 * Donating to EFF:                    https://eff.org/donate-le
- - - - - - - - - - - - - - - - - - - - - - - - - - - - - - - - - - - - - - - -
postfixの設定変更
/etc/postfix/main.cfに以下を追加する。
# SSL/TLSの設定
smtpd_tls_security_level = may
smtpd_tls_cert_file = /etc/letsencrypt/live/svr.sakanashi.mydns.jp/fullchain.pem
smtpd_tls_key_file = /etc/letsencrypt/live/svr.sakanashi.mydns.jp/privkey.pem
smtpd_tls_session_cache_database = btree:${data_directory}/smtpd_scache
/etc/postfix/master.cfの以下の部分を変更する。
submission inet n       -       y       -       -       smtpd :コメント解除
  -o syslog_name=postfix/submission :コメント解除
#  -o smtpd_tls_security_level=encrypt
  -o smtpd_sasl_auth_enable=yes :コメント解除
SMTPSを使うために以下を追加する。
# SMTPS (465) を使用する設定
smtps     inet  n       -       n       -       -       smtpd
  -o syslog_name=postfix/smtps
  -o smtpd_tls_wrappermode=yes
  -o smtpd_sasl_auth_enable=yes
dovecotの設定変更
/etc/dovecot/conf.d/10-ssl.confの以下を変更する。
ssl = yes  : コメント解除

ssl_cert = </etc/letsencrypt/live/svr.sakanashi.mydns.jp/fullchain.pem  : コメント解除&パス変更
ssl_key = </etc/letsencrypt/live/svr.sakanashi.mydns.jp/privkey.pem  : コメント解除&パス変更
ポートを開ける
SSL/TLSのポートを開ける。
ufw allow 995/tcp
ufw allow 465/tcp
※ STARTTLSを使う場合はポートは25、110が空いていればよいらしい。
postfixとdovecotを再起動
準備ができたところで、postfixとdovecotを再起動する。
systemctl restart postfix
systemctl restart dovecot
メーラーの設定変更&テスト
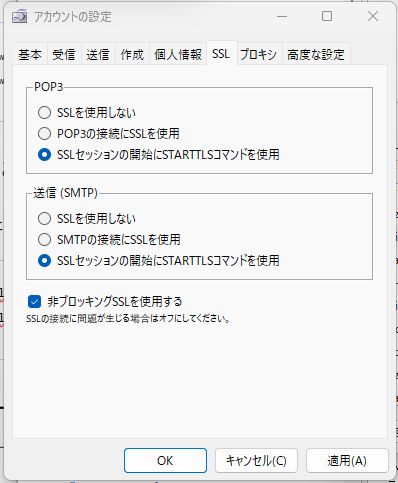
メーラーのアカウント設定で接続方法を変更してテストを行う。
sylpheedで以下のように設定、送受信のテストを行い、正常に動作することを確認した。